
How to set up an eSIM
Android (QR code settings)
Please be sure to check
Setting up an eSIM requires a stable internet connection.
The usage period will vary depending on the eSIM you purchase, so please check at the time of purchase.
The display and language may vary depending on your model and OS version.
Please make sure to prepare the following items:

The device you want to set up the eSIM on
Please prepare a SIM-free or SIM-unlocked device.

Internet environment (Wi-Fi, etc.)
Your device must be connected to the Internet.
STEP1
Load the eSIM onto your device
*The usage period will start once activation is complete and the device receives local communication signals.
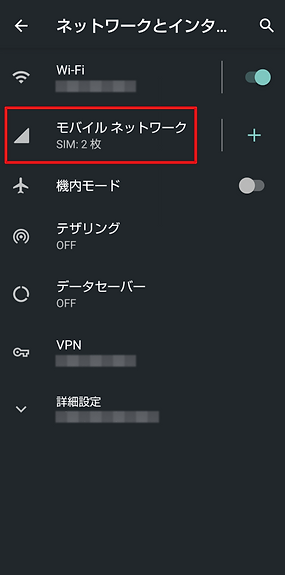
01
端末の設定から【ネットワークとインターネット】をタップして【モバイルネットワーク】の横にある"+"ボタンを押してください。

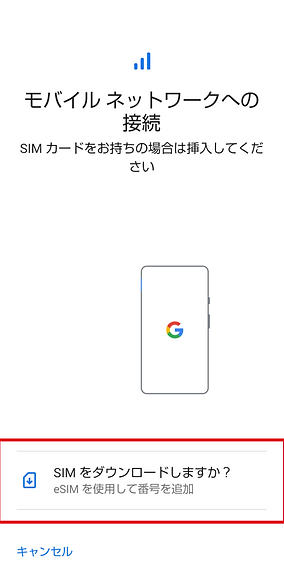
02
Download the SIM.
-
SIMをダウンロードしますか?」をタップし、「次へ」をタップします。
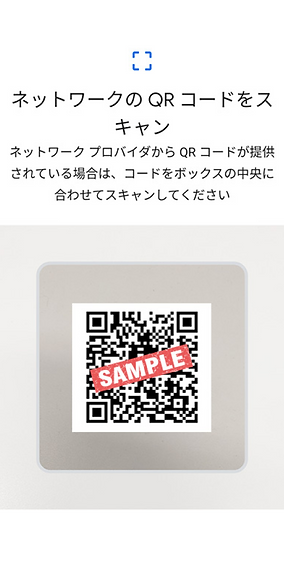
-
QRコードを読み取ります。
※eSIM読み込み用のQRコードは、アプリ・マイページ・メールにてご確認いただけます。別のデバイスで表示するか、あらかじめプリントアウトするか、または、同行者にQRコードを表示してもらってください。
03
インストール完了。
This completes the loading of the World eSIM onto your device (profile installation). Next, proceed to the eSIM connection settings on the device management screen.
STEP2
eSIM connection settings on the device management screen
01
02
03
Go to Settings, tap "Network & Internet" > "Mobile Networks" and select your newly installed eSIM.
*The name of the mobile network may vary depending on the eSIM plan purchased.
Activate the newly installed eSIM and select "Yes".

「モバイルデータ」と「ローミング」を有効にしてください。
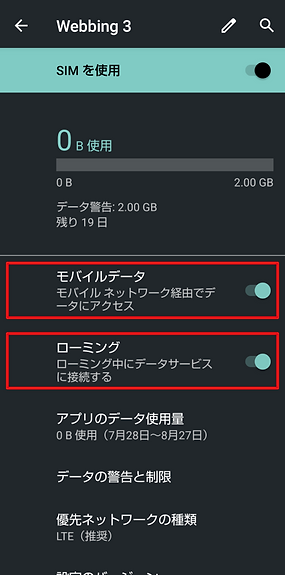
Depending on your device and eSIM plan, this may be all you need to do to complete the setup. Please check to see if you can connect to the Internet.
If you are not connected, please proceed to the next step.
04
Scroll down and tap "Advanced Settings", then tap "Access Point Names" that appears.


05
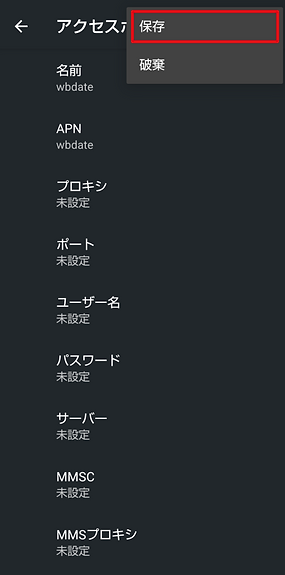
アクセスポイントを編集します。
Tap “+”.
Please enter your name in the "①Name" and "②APN" fields.
[Name: You can use any name. APN: Enter the APN sent to you via email.]After entering the information, tap ③ and select “Save.”


06
Setup complete!
This completes the setup of your eSIM. The procedure may vary depending on your device settings, OS, update version, etc.
Changing settings after returning home
-
To change the settings after returning home, select your carrier in [01] and repeat the steps in [03].